

Watermarks are semi-transparent images or text overlays placed on photos to protect them from unauthorized use. If you run a blog or regularly publish content online, learning how to add one is an essential skill. In this step-by-step tutorial, you will learn how to add a watermark in Canva in just a few quick steps.
What program should I use?
You can use almost any graphic design software to add a watermark. However, this tutorial uses Canva – one of the most popular free online tools available.
Canva allows you to apply watermarks to your photos completely free of charge. Thanks to its convenient mobile app, you can even watermark your images and publish them directly to social media right from your phone.
How to Add a Watermark in Canva
Before starting, make sure you have both your photo and your watermark file ready.
Need watermark? Check our accessories shop.
For this tutorial, feel free to use your own assets or download practice files here. Once your files are ready, open Canva to begin.
Step 1: Create a New Design
Log in to your Canva account and click Create in the top-right corner.

To make things easy, select the Custom size option and set the dimensions to match the exact width and height of the photo you want to watermark. Finally, click Create new design to open your canvas.
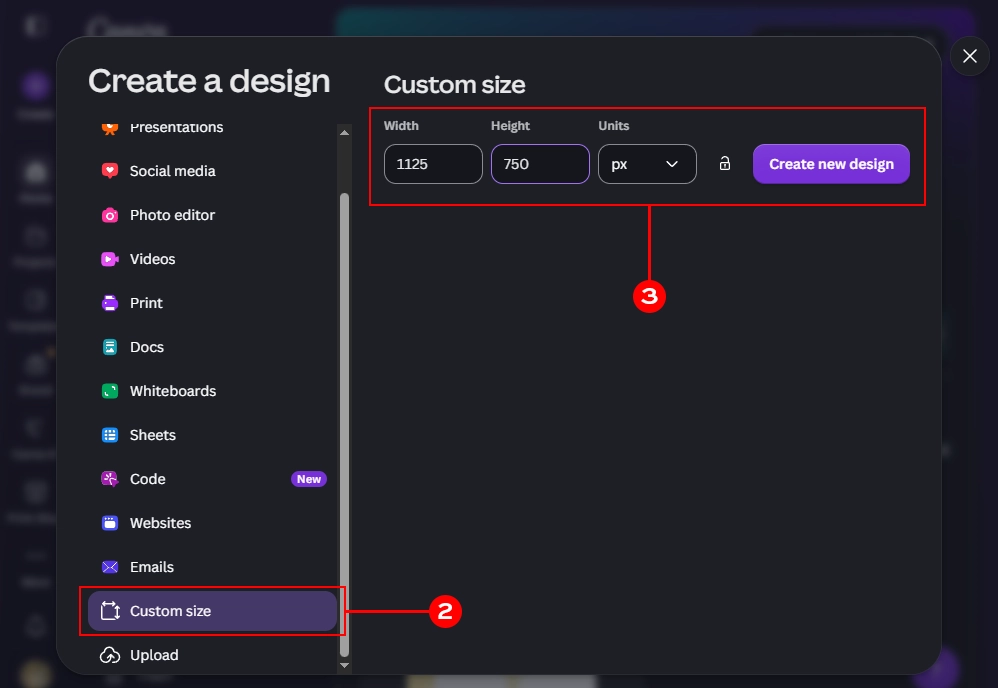
Remember that with the free version of Canva, you can’t resize an already created project. If you need it to have a different size, you will need to create a new design.
Step 2: Upload Your Files
In the new window, go to the ‘Uploads’ tab on the left and add your photos by choosing ‘upload files’ button on the top.

All uploaded files will be accessible from this place until you remove them. It means that you need to upload your watermark just once, and you can then use it for all your projects.
Step 3: Add the Photo and Watermark
Click or drag your photo from the Uploads panel into the canvas area on the right. If you want it to cover the whole area, make sure to drag it to the top before dropping it.
Now add your watermark. You can either click on in on the left upload files area or drag and drop it over your photo. Once added, move it to the desired place
Step 4: Adjust the Transparency
Watermarks are typically semi-transparent so they do not completely obscure the main image. If your watermark file is currently solid, you can easily adjust its opacity inside Canva:
- Click to select the watermark layer.
- Click the Transparency icon (the checkerboard grid) in the top toolbar.
- Adjust the slider to your desired level (a setting between 25% and 50% usually works well).

Step 5: Save and Download
Once your watermark is positioned and adjusted, click the Share button in the top-right corner and select Download.

Select your preferred file format:
- JPG: Best for blog posts and website content to keep file sizes small and load times fast.
- PNG: Best for high-resolution social media posts or images requiring crisp detail.
Click Download to save the finished image to your device.
Here is how the final photo looks like. I have saved it as JPG with default Canva settings:

I hope the tutorial was helpful and you learned how to add watermark to photos! If you have any questions, make sure to let me know in the comments below.